
The menu item "Compiler Preferences" opens the preferences window for
the compiler where you can set the classpath etc..
The entry "Preferences Runtime"opens the window where you can change
runtime environment settings, e.g. the VM that shall be used.
The menu item "Select Main - Method" defines the class that will be
started. As more than one class can have a main() - method in Java, you
must select the class that shall be started manually. The first time you
start compilation, this window is opens automatically.
The menu item "Delete all compiled classes" ist used for deleting all
Jedi generated classes. All classes will be marked to be recompiled next
time. You sometimes have to use this menu item if the compiler is working
wrong and cannot solve class dependences. Changing the compiler will apply
this action automatically.
The last menu item closes the window. Neither the compiler will stop
nor the running programm will end. If the compiler is running and finds
an error, the window will automatically reopen.
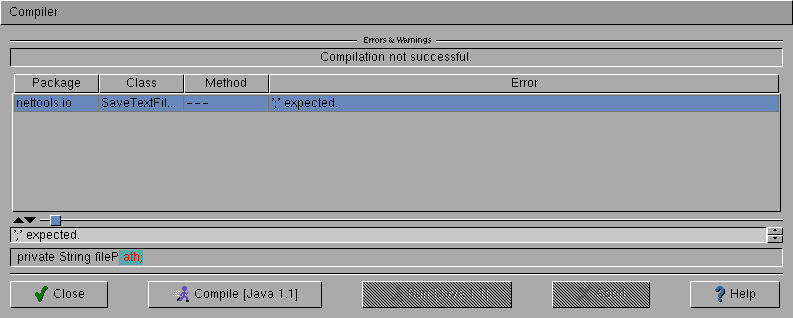
In the upper textbox, the current compiler status is shown. Next, the table lists the errors that were found. Clicking an entry will move you to the code location where the error appeared and the textbox under the table shows the exact error message (in the table it is sometimes clipped when there is not enough room). The code line is shown, too. The highlighted string displays the exact error location.
The buttons at the bottom control the compiler and the runtime environment.
Not every action can be executed at any time. The button "Close" closes
the compiler window and corresponds to the one in the menu.
Pressing the "Compile" - button will start the compiler. The name of
the used compiler appears in the button.
When translation is finished, the application can be run. The name
of the VM is shown again.
The "Abort" button stops compiling or the running programm, depending
on what is currently being done.