The Jedi Tutorial
Starting an application
After building an application, Jedi will activate the 'Run
(Java x.x)' button in the 'compile'
window. By clicking this button, one can launch the application. Before
doing that the first time, however, some preparation is necessary. Jedi
must be informed where the java virtual machine resides.
Setting up the runtime environment
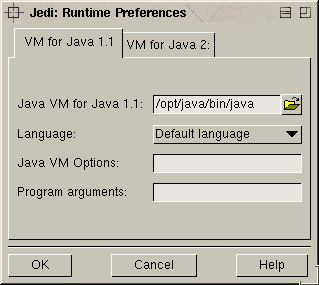
 Open
the 'Runtime Environment' preferences
dialog via the 'Prefs' menu. Here we
need to specify which java vm we want to use. This is usually '<javadir>/bin/java'.
Click on the icon right of the 'java vm'
box and a requester will appear that lets you search for the vm. See the
runtime
preferences help for more details. After selecting it, click 'Ok'
and close the dialog by clicking 'Ok'
again.
Starting the first application
 Now start the
application. One way to do that is the 'Run
(Java x.x)' button in the 'compile'
window. But you can also use the 'launch'
button in Jedi's toolbar. It is the icon that displays a sheet of
paper showing binary digits. On the console you should see the following
text displayed:
---------- OUTPUT OF RUNNING PROGRAM ----------
Hello, World!
Note that Jedi prints standard out to the console it was started
from. The output of your program is not redirected to another window. If
you have started Jedi using a desktop icon, you will not see any
output. This is especially good to know if you want to do debugging println.
What next?
At this point you should know enough about Jedi to start work. If
you need more information or are just curious about all those configuration
options we have not touched yet, simply open the dialog that contains the
options and hit 'Help'.
The following pages will introduce some features that are not necessary
for everyday work. Still they are interesting
and useful.
 Open
the 'Runtime Environment' preferences
dialog via the 'Prefs' menu. Here we
need to specify which java vm we want to use. This is usually '<javadir>/bin/java'.
Click on the icon right of the 'java vm'
box and a requester will appear that lets you search for the vm. See the
runtime
preferences help for more details. After selecting it, click 'Ok'
and close the dialog by clicking 'Ok'
again.